square
Square Smart Frame Setup Guide
To complete the setup, we recommend downloading the Square app (available on Apple Store and Google Play Store). The app allows you to:
- Pair the Square Frame with your trainer.
- Configure gear settings and profiles.
- View real-time gear ratio data during workouts.
Powering On and Initial SetupTo turn on Square for the first time, press and hold the right and left arrow buttons on the left handlebar lever for 5 seconds. When the LEDs start flashing, Square is on.
Square automatically enters standby mode after 5 minutes of inactivity. To reactivate it, press any button on the left handlebar control.
Pairing Square with a Trainer- Plug in the trainer.
- Download and open the Square app on your device.
- Follow the on-screen prompts for the initial setup.
- Go to Settings, find your devices, and select Pair for both Square and the trainer.
If you prefer to pair Square and the trainer manually:
- Press and hold the X and O buttons on the left handlebar lever.
- Release the buttons when the LEDs start flashing.
- When the LED remains solid, pairing is complete.
Configuring with Training Software
To use Square with indoor training software, follow the procedure based on the type of trainer you own.
If you are using an Elite trainer: Select the Elite trainer (e.g., Direto XR) as the primary device.
If you are using a trainer from another brand (Wahoo, Tacx, etc.): Select Square as the control device.
Configuration with Software and Elite Trainer
- Make sure your Elite trainer is updated with the latest firmware version.*
- Ensure the Elite trainer is already connected to Square.
- Open the training software.
- Pair the Elite trainer (e.g., Direto XR), not Square.
* During the pairing of the hometrainer with the Square app, you will receive a notification if the trainer requires an update. If, at the end of the pairing, the app shows no notification, it means that the trainer's firmware is already up to date.
The firmware update procedure for your Elite trainer is simple. Thanks to the Bluetooth connection, the Upgrado app automatically recognizes your trainer and notifies you if an update is available.
To start the update, just select the trainer's name from the list of detected devices.
The Upgrado app is available only on mobile devices.
Configuration with Software and Non-Elite Trainer
- Ensure that Square, the trainer, and the software are turned on.
- Connect the trainer to Square.
- Open the training software and pair Square, not the trainer.
Standalone Mode Configuration (Without Software)If you want to use Square without training software, activate Standalone Mode.
- Ensure the Elite trainer is connected to Square.
- Select one of the 16 available resistance levels.
- Adjust resistance using the handlebar levers:
- Right lever: Increases resistance.
- Left lever: Decreases resistance.
Gear SettingsSquare features a customizable virtual gear system.
- The default gear system is Shimano, but you can select Sram, Campagnolo, or sequential via the app.
- You can customize the number of chainrings, cogs, and teeth to match your preferences.
Using the Gear Shift LeversUse the levers to simulate your desired gear ratio.
In the Square app, you can monitor:
- Selected gear group.
- Square’s battery status.
- Connection to the trainer.
Handlebar ButtonsThe handlebar buttons can be used for:
- Searching for the trainer.
- Adjusting the speed of the Aria smart fan (if available).
- Virtual Steering: Currently in development. Compatible with Elite Rizer.
Square Extra FeaturesSquare offers advanced functionalities to optimize your training experience. You can:
- Set up the Rizer.
- Pair the Aria fan.
- Use steering options (in development).
Rizer InstallationTo install the Rizer, you will need the included adapters and quick release.
- Attach the quick release adapters to the Rizer, then loosen and insert the quick release.
- Secure the bracket to Square using the four provided screws in the corresponding holes.
- Attach the bracket to the Rizer and fully tighten the quick release. Be careful with your fingers during this step!
Aria Fan ConfigurationTo pair the Aria smart fan:
- Ensure the trainer is turned on.
- Press and hold the X and O buttons until the right LED stops flashing.
- Pairing is complete.
Important: Without a trainer, Square will not connect to Aria.
Adjusting Airflow Control- Increase airflow: Press the triangle button (right handlebar side).
- Decrease airflow: Press the square button (left handlebar side).
- Switch between automatic/manual mode: Press and hold Square and Triangle together.
After the first setup, Square will automatically connect to Aria on startup.
Virtual Steering with Handlebar Buttons- With the X and O buttons, you can steer your avatar on Zwift (feature in development).
- Currently, the Rizer is required for this function.
Enjoy your workout with Square!
Square smart frame compatibility
Listed below are the various compatibilities of the new Square smart frame with the various home trainers and accessories available:
Which Elite trainers are compatible with Square?
Here below the list of the Elite trainers compatible with Square smart frame:
- Avanti
- All Direto home trainers (Direto, Direto X, Direto XR, Direto XR-T, Direto XR Team, Direto XR Cog)
- Justo and Justo 2
- Suito and Suito-T
Which other brands trainers are compatible with Square?
Here is the list of trainers of other brands compatible with Square:
- Magene: T600 - T300
- Saris: H3
- Tacx: Flux, Neo 2, Neo 3M
- Wahoo: Kickr V4, Kickr V5, Kickr V6, Kickr Core, Kickr Move (with oscillation disabled).
- Zwift: Hub
For home trainers not included in the above list, check their structural compatibility with Square before purchasing.
In addition, it is necessary that the trainer supports the ANT+ FEC protocol to ensure correct transmission of training data.
Is Square compatible with other accessories of the ecosystem from Elite or other brands?
Square is compatible with the Elite ecosystem accessories: the gradient simulator Rizer and the smart fan Aria, but not, at the moment, with those of other brands.
WARNING: if Rizer is used together with Square, only the trainers that allow the rotation of the bike's rear carriage and that support the use of gradient simulators for front bike wheels are compatible with the Elite’s smart frame. This applies to both Elite and other brands trainers.
Using Square together with Rizer and not-compatible-with-Rizer trainers can cause severe and irreparable damage to Square frame.
To check the compatibility of Elite or other manufacturers trainers with Rizer, please check Rizer compatibility
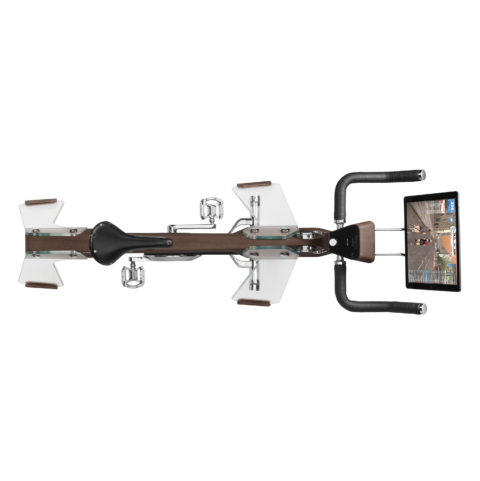
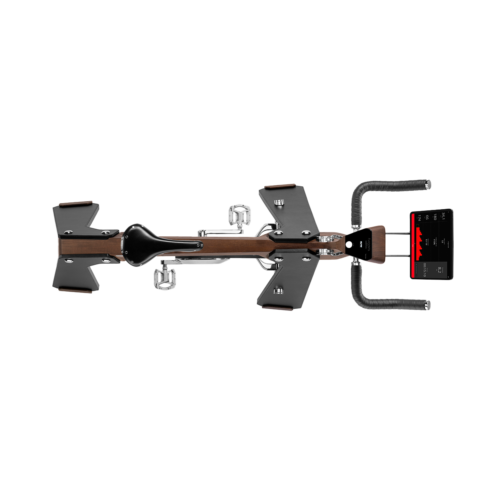
Square handlebar assembly and disassembly
When using Square for the first time, or if you need to remove the handlebar for replacement or storage, it's essential to follow the correct procedure to avoid damage and ensure a secure reassembly. Below are the steps for assembling and disassembling the Square handlebar.
Tools Needed:
• 4 mm hex key (included)
• Phillips screwdriver
• M2.5 screws (3 Nm) for Garmin mount
Assembly Procedure
Installing the Handlebar
1. Remove the handlebar from the packaging.
2. Insert the handlebar stem into the designated slot in the main post (fig. 3a).
3. Ensure it is securely positioned.
4. Align the handlebar with the bike (fig. 3b).
5. Tighten the handlebar screws using the 4 mm hex key, applying a torque of 5 Nm (fig. 3c).Installing the Garmin Mount
1. Place the included Garmin mount insert on top of the handlebar stem.
2. Using a Phillips screwdriver, fasten the M2.5 screws (3 Nm) into the designated holes along the longitudinal axis of the Square (fig. 4).
3. If the cycling computer is rotated 90°, secure the Garmin mount using the M2.5 screws (3 Nm) positioned along the transverse axis of the Square.
Disassembly Procedure
1. Remove the cycling computer if installed.
2. Unscrew the M2.5 screws from the Garmin mount using a Phillips screwdriver.
3. Loosen the handlebar screws with the 4 mm hex key (included).
4. Gently remove the handlebar stem from the main post.
5. Store all components (screws, hex key, Garmin mount) in a safe place for reassembly.Square smart Frame Adjustments
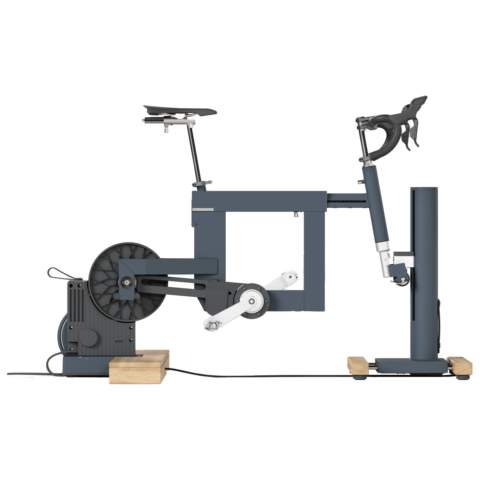
Square is designed to accommodate cyclists of different sizes, from XS to XL, offering a highly customizable setup that precisely replicates the geometry of your bike. With millimeter-accurate adjustments and integrated measurement scales, you can fine-tune your position quickly and easily, ensuring maximum comfort and a natural pedaling motion.
The available adjustments include:
Saddle height: from 57 cm to 88 cm
Saddle fore-aft position: from 170 mm to 293 mm
Handlebar height: from 84.5 cm to 106 cm
Top tube length: from 498 mm to 814 mm
Crank arm length: five options available (165 mm, 167.5 mm, 170 mm, 172.5 mm, 175 mm)
Square easily adapts to multiple users without the need to constantly mount and dismount a bike, making it ideal for shared training setups.
The following table provides a detailed overview of all available adjustments, including the suggested settings based on the rider’s height.How to replace the CR2032 battery in your Square handlebar
The Square frame uses a 3V CR2032 battery, located in the right control lever of the handlebar.
You can check the battery status in the Square app when the device is connected.
If the battery is low, the Square will show a "low battery" warning at startup, with the right and left lever LEDs flashing alternately for 5 seconds.What You Need
• 1 new CR2032 3V battery
• PH1 Phillips screwdriver
Watch the video below for the replacement steps:Procedure
1. Lift the rubber cover on the right lever.
2. Remove the two screws from the battery cover using a PH1 Phillips screwdriver.
3. Take off the cover to access the battery.
4. Gently move the thin black protective sheath to expose the battery.
5. Remove the CR2032 battery by lifting it upwards carefully.
6. Insert the new battery, ensuring the positive (+) side faces outward.
7. Put the black protective sheath back in place.
8. Reposition the battery cover and secure it with the two screws.
9. Tighten the screws with the PH1 Phillips screwdriver, but do not overtighten.
10. Put the rubber cover back in place.
11. Check functionality by turning on the Square and verifying the battery status in the app or by pressing the ABYZ buttons, which should trigger the keyboard LEDs to light up.⚠ Dispose of the used battery according to local regulations.
How to find the serial number
Each Elite home trainer or electronic accessory has a unique serial number.
It is important to get all the information about the product and you need to know it to redeem your coupon codes or for any assistance requests.
A silver label, usually on the underside of the product, contains the serial number.
It is an alphanumeric value of 9 or 13 digits.
Upgrado: Manage the available firmware updates for Elite interactive devices (smart trainers and accessories). +7
Get Upgrado to upgrade the firmware of your Elite interactive devices (smart trainers and accessories).
Upgrado is the dedicated app for updating the firmware of interactive devices for indoor training.
A firmware is the set of instructions that make up the operating system of all interactive trainers available on the market.
Firmware updates allow manufacturers to introduce new features or improve the performance of devices, which is why it's important to perform them when new releases are available.
To update the firmware of our devices, simply download the application on your smartphone or tablet. Upgrado is available only on mobile devices.
In addition to performing firmware updates, Upgrado also allows you to check for other available updates.
Note: The update procedure is not necessary for the Avanti and Justo 2 rollers. Thanks to Wi-Fi connectivity, the Justo 2 and Avanti rollers can automatically download the firmware when a new version is detected. The download is indicated by the quick flashing of the white LED. During this phase, the roller can still be used.
Upon the next startup after the download, the roller will install the new firmware. This phase is indicated by the quick flashing of the blue LED. During installation (which takes a few minutes), the roller will not be visible to training apps. Before starting your workout, wait for the rapid flashing of the blue LED to finish.
How do I update my device’s firmware?
To update the firmware on your trainer or smart accessory (e.g., Aria, Rizer, Square, Zona, .. ), just follow these 4 simple steps:
- Enable Bluetooth on your mobile device;
- Launch Upgrado. The app will automatically detect nearby connected devices.
- Click on your device name to search for new updates.
- Upgrade to the latest firmware release.
Updating the firmware is very easy: Upgrado will see your device among the available devices via its Bluetooth connection, notifying the availability of any new update.
After confirmation from the user, the app will finalize the update on the selected device right away.
How do I download the Upgrado app?
Upgrado funziona sia su dispositivi Android che iOS ed è disponibile al download in tutto il mondo su Google Play e su App Store a questi link:
https://play.google.com/store/apps/details?id=com.elite.android.fota
https://apps.apple.com/app/upgrado/id1482090297
Note
_ La connessione con Upgrado è possibile solo se lo smartphone/tablet dispone del protocollo Bluetooth, ed il Bluetooth sia la versione corretta. Per verificare ciò riferirsi a questo articolo: Verifica compatibilità device (tablet/smartphone) con ANT o Bluetooth Smart
_ La connessione tra Upgrado ed il trainer da aggiornare avviene tramite il protocollo Bluetooth. Per caratteristiche del Bluetooth, questa connessione avviene in maniera esclusiva, quindi se il trainer è connesso a qualche altro software, Upgrado non è in grado di trovarlo durante la ricerca. L'avvenuta connessione è notificata nella scheda elettronica dall'accensione del LED blu. Prima di iniziare la ricerca del dispositivo in Upgrado, verificare che il led Blu della scheda sia lampeggiante, se il led blu è acceso fisso, allora il dispositivo è connesso con un software/programma/app/device e quindi Upgrado non sarà in grado di connettersi al rullo. In questo caso, chiuderli, disalimentare e rialimentare il dispositivo e riprovare la connessione con Upgrado.
_ La procedura serve a verificare la presenza di eventuali aggiornamenti del firmware. Se il dispositivo dispone già dell'ultima versione, al termine del controllo apparirà un messaggio che indicherà che è già aggiornato.
_ Gli aggiornamenti Firmware potrebbero essere disponibili solo per alcune aree geografiche
_ In caso la procedura non vada a buon fine:
- togliere l'alimentazione al dispositivo (rullo o accessorio smart es. Rizer o Aria)
- chiudere l'app Upgrado
- avviare nuovamente l'app Upgrado
- alimentare il dispositivo
- ritentare nuovamente l'intera procedura
- verificare che appena iniziata la procedura di aggiornamento, il LED blu inizi a lampeggiare velocemente, ad indicare che la procedura ha correttamente avuto inizio.- Se ancora non dovesse aver successo, contattare ELITE ( info@elite-it.com con oggetto "Aggiornamento Upgrado non riuscito" )
_ I trainer della famiglia Real (RealAxiom, RealTour, RealPower, RealEmotion e RealTurbomuin, anche nelle varianti ANT e B+) non dispongono di aggiornamenti firmware, pertanto non vengono rilevati dall’app Upgrado.